This post may contain affiliate links. Read my disclosure policy.
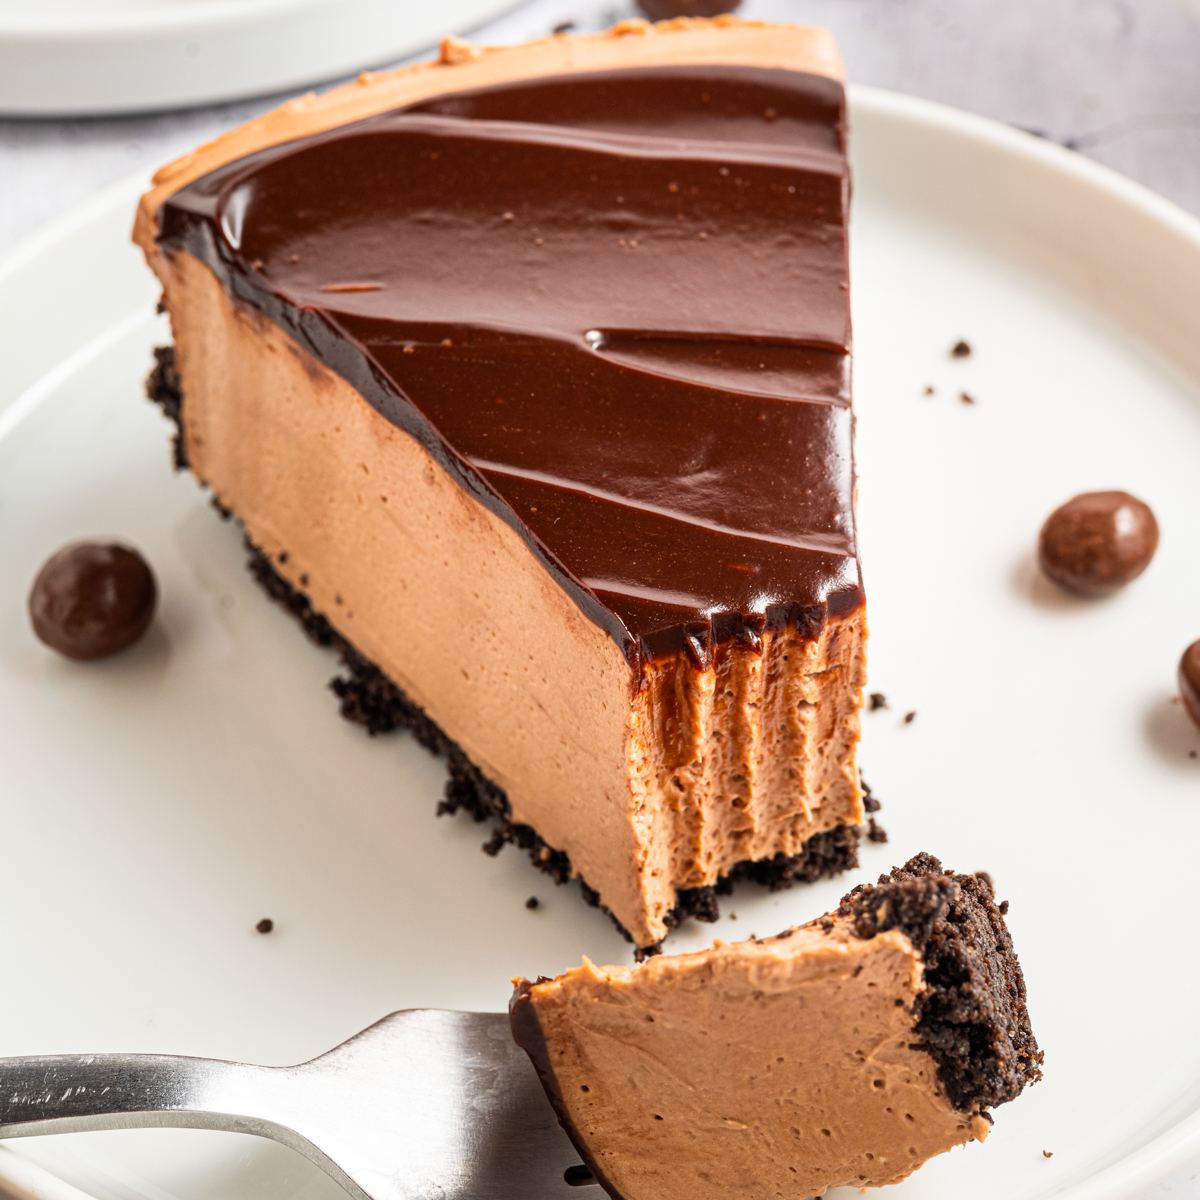
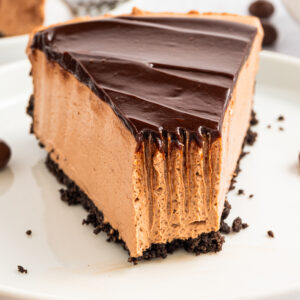
This no-bake mocha cheesecake features an Oreo crust, creamy espresso-chocolate filling, and decadent glossy chocolate ganache for the ultimate coffee lover’s dessert. You can make it at home in 30 minutes—no oven needed!

This isn’t your average cheesecake! I love how the combination of instant espresso and cocoa powder makes each creamy bite taste like a mocha latte—perfect for coffee and chocolate lovers seeking a showstopping, restaurant-quality treat for any occasion. Tangy cream cheese filling has a smooth texture with a rich chocolate flavor complemented by notes of coffee – nestled in a crumbly oreo crust. If love chocolate as much as I do, check out my gluten-free flourless chocolate cake (with raspberries), chocolate pear cake, super moist chocolate tres leches cake, and chocolate tart.

- No-bake, no oven, no water bath, and no chance of a cracked cheesecake. This mocha cheesecake is super simple—only 30 minutes of prep, even though it looks quite impressive. Because it’s no-bake, it’s perfect comfort food for the fall and winter holidays when your ovens are busy with other foods and desserts, like my Thanksgiving Apple Pumpkin Pecan Bundt Cake or Cinnamon Pie.
- Sturdy, Pressed Oreo Crust: I use a freezer-hardened Oreo crust for maximum crunch and deep chocolate flavor—it’s easy and sturdy for a great foundation (and presentation!).
- Mousse-like filling: I fold freshly whipped cream into the cream cheese base for a mousse-like consistency—rich yet not heavy, ideal after a big dinner or for holiday spreads (Thanksgiving, Christmas, New Year’s).
- Dramatic Ganache Topping: Pouring over the glossy mocha ganache is my favorite part, and it gives this mocha cheesecake a professional, restaurant-style look without any special decorating skills. This is one of the cakes I will be making if I want to impress my family and friends (with only 30 minutes of prep!)
- Make-Ahead Friendly: Since it needs plenty of chilling, I recommend making this the day before guests arrive. It’s ideal for holiday gatherings like Christmas, Easter, ir Mother’s Day just like my other holiday desserts: cranberry apple pecan bundt cake and pear almond cake. You can even make it for summer BBQs and brunches (since it’s no-bake and there is no need to turn on the oven!).


- Oreos – Use whole Oreos. The creme filling will help the crumbs stick together. You can also try chocolate graham crackers or chocolate wafers for the crust instead of Oreos.
- Butter – I used unsalted butter, but salted butter will work for this crust, too.
- Heavy whipping cream – Cold cream will whip up faster than room temperature cream.
- Cream cheese – I used full-fat cream cheese at room temperature. It’s easier to blend.
- Unsweetened Cocoa Powder – I used Hershey’s Natural Unsweetened Cocoa Powder.
- Instant Espresso Powder – I used Medaglia D’Oro Espresso Instant Coffee.
- Powdered sugar – It dissolves easily and stabilizes the filling. If you use granulated sugar the mocha cheesecake filling will feel gritty.
- Vanilla extract – You can use vanilla bean paste or a splash of coffee liqueur (Kahlúa) instead.
- Semi-sweet chocolate chips – I used Nestle Tollhouse semi-sweet chocolate morsels. A high quality brand of chocolate chips will melt smoother and easier. You can also chop up a 4-ounce semi-sweet chocolate bar instead of using chocolate chips.
- Light corn syrup – This is optional, but it gives the ganache a pretty shine and sweetens the ganache a little bit. The light corn syrup can be omitted, but the ganache will not be as shiny.


- Note: This is a quick visual guide with step-by-step photos; for precise measurements and full instructions, see the recipe card below.
- Make crust: Grease a 9-inch springform pan. Crush Oreos in a food processor, then blend in melted butter until clumpy. Press crumbs into the pan bottom and sides, and freeze for 20 minutes until firm.


- Make mocha cheesecake filling: Whip the heavy cream until stiff and set aside. Beat cream cheese, cocoa powder, and espresso powder until smooth, then mix in powdered sugar and vanilla.

- Fold in the whipped cream into the cheesecake filling until smooth.

- Spread mocha cheesecake filling over the crust, and chill covered for at least 6 hours (overnight is best).

- Make mocha ganache: Mix cream and espresso powder, microwave until steaming, then add chocolate chips and let sit 2 minutes. Stir until smooth.

- Release the cheesecake from the springform pan and transfer to a plate.
- Pour the chocolate ganache over cheesecake, and let rest 10 minutes before slicing and serving chilled.


Mocha Cheesecake (No-Bake)
Crust:
- 22 cookies Oreos
- 5 tablespoons butter
Mocha Cheesecake:
- 1 ½ cups heavy whipping cream
- 24 ounces cream cheese
- ⅓ cup unsweetened cocoa powder
- 1 tablespoon instant espresso powder
- 1 cup powdered sugar
- 1 teaspoon vanilla extract
Mocha Ganache:
- ¼ cup heavy whipping cream
- 2 teaspoons instant espresso powder
- ½ cup semi-sweet chocolate chips
- 1 tablespoon light corn syrup
Crust:
-
Grease a 9-inch spring form pan with shortening or butter and set it aside.
-
Use a food processor to crush the Oreos into fine crumbs. Slowly pour in the melted butter while the processor runs at low speed until the crumbs start to clump together.
-
Pour the crumbs into the greased spring form pan, and firmly press them into the bottom and up the sides. Freeze the crust for at least 20 minutes or until it has hardened.
Mocha Cheesecake Filling:
-
While the crust is freezing, pour the heavy whipping cream into a medium or large mixing bowl, and use an electric mixer to whip the cream until it is stiff. Set aside.
-
Add the cream cheese, cocoa powder, and instant espresso to a large bowl, and beat with an electric mixer until combined and smooth.
-
Mix in the powdered sugar and vanilla extract until combined, then fold in the whipped cream thoroughly.
-
Spoon the cheesecake filling over the hardened crust, and smooth it out evenly. Cover the cheesecake with plastic wrap, and chill in the fridge for at least 6 hours, but overnight is best.
Mocha Ganache:
-
When you are ready to serve, run a thin knife around the edge of the cheesecake and carefully release the ring of the pan. Transfer the cheesecake to a large plate or cake stand.
-
Stir the heavy whipping cream and espresso powder in a small, microwave-safe bowl, then heat for 1 minute in the microwave or until it starts to steam.
-
Add the chocolate chips, and let them rest for 2 minutes. Stir until all of the chocolate has melted and the ganache is smooth.
-
Spoon the ganache over the cheesecake and spread it out over the top. Let the cheesecake rest for about 10 minutes before slicing and serving chilled.
- Make sure the cream cheese is smooth and lump-free before adding the whipped cream.
- The ganache should be smooth with no lumps of chocolate chips for the best results.
- Use the flat bottom of a measuring cup or glass to help firmly pack the Oreo crumbs into the pan. This will help keep the crust intact when it’s sliced.
- Can I make it gluten-free? Yes! Use gluten-free chocolate sandwich cookies or gluten-free wafers for the crust—The filling and ganache are naturally gluten-free.
- What if I don’t have instant espresso powder? Substitute instant coffee powder, but double the amount for the same mocha strength—or try a shot of strong brewed espresso, just reduce the cream.
- Can I make this without a springform pan? Yes. I recommend using a 9-inch deep pie dish or an 8×8-inch square pan (high-sided). Line with parchment for easy lift-out; the yield and chill time remain similar.
Storage Instructions
- Refrigerator: Wrap the mocha cheesecake with plastic wrap or store it in an airtight container in the fridge for up to 3 days.
- Freezer: Wrap the cheesecake in both plastic wrap and foil to prevent freezer burn, and store in the freezer for up to 2 months. Thaw overnight in the fridge before serving.
You will need these supplies/equipment:
- 9-inch spring form pan
- Butter or shortening for greasing the pan
- Food processor
- Medium and large mixing bowls
- Electric mixer
- Small, microwave-safe bowl
The nutritional information on this website is only an estimate and is provided for convenience and as a courtesy only. The accuracy of the nutritional information for any recipe on this site is not guaranteed. It should not be used as a substitute for a professional nutritionist’s advice.

- Can I make mocha cheesecake ahead of time? Absolutely! I actually RECOMMEND making it a day in advance. Chilling overnight gives the best, sliceable texture and lets the flavors develop.
- How can I ensure the filling is smooth and not lumpy? Make sure the cream cheese is very soft and beat it thoroughly before adding other ingredients. Sift cocoa powder if your brand is clumpy.
- Why is my filling loose? Most likely the cream wasn’t whipped to stiff peaks or the cream cheese was too cold and didn’t blend smoothly. Whip the cream fully, beat the cream cheese until silky, then fold gently and chill overnight.
- Is this recipe freezer-friendly? You bet. Wrap tightly, freeze up to 2 months, and thaw overnight in the fridge for a make-ahead party dessert.
- Is the coffee flavor strong? It’s balanced. I use espresso powder for clear and strong mocha flavor without bitterness. If you want milder, reduce espresso by ½; for bolder, add 1–2 teaspoon more to the filling or ganache.
- Can I skip the corn syrup in ganache? Absolutely. The ganache will still set and taste great, just a little less glossy. If omitting, I recommend adding ½ tablespoon of melted butter.


I’d love to hear from you—leave a comment, a star rating, or a question and I always do my best to reply promptly. If you make this recipe, tag me on Instagram or add/share a photo under my latest Facebook post!
This creamy, no-bake mocha cheesecake with an Oreo crust and shiny espresso-chocolate ganache that slices like a dream and tastes like your favorite café dessert. It’s so easy to make – it took me only 30 minutes to assemble it and then 6 hours to chill it (idle time). It’s such an easy cheesecake that even beginners can easily make it, and I highly recommend you try it. It will definitely make a great addition to your Thanksgiving menu or will be a nice dessert for Christmas or New Year’s Eve. If you have any questions or tried this recipe, please leave a comment below.