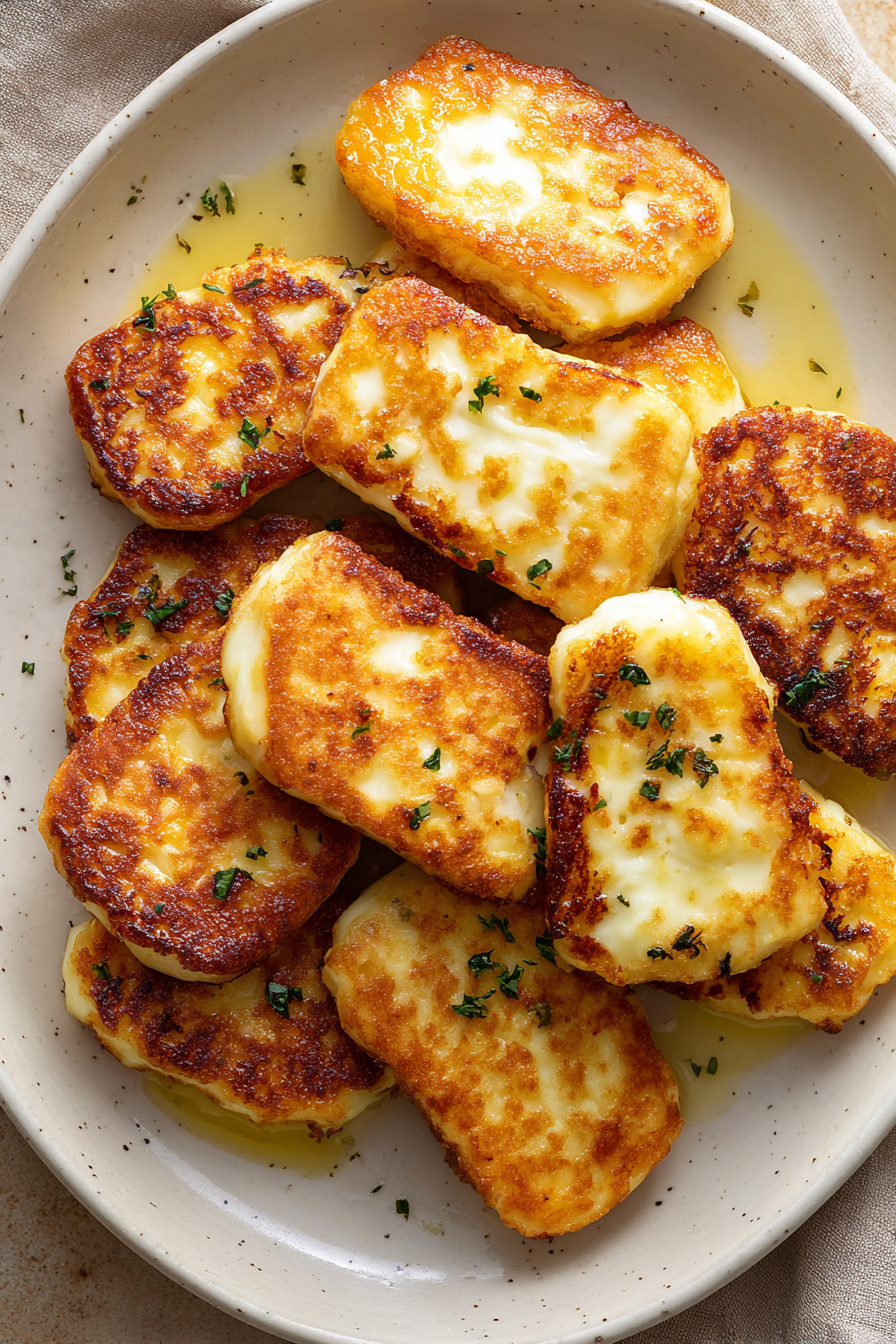
If you’ve ever tasted perfectly golden, crispy-on-the-outside, gooey-on-the-inside halloumi, you know exactly why this simple cheese dish has a cult following. My first encounter with halloumi was during a summer trip to Cyprus — I still remember that sizzle as the cheese hit the hot pan, releasing a faint, salty aroma that instantly made me fall in love. It was one of those “aha” kitchen moments where I realized that sometimes, the simplest ingredients make the most unforgettable dishes. No fancy sauces, no complicated prep — just pure, indulgent flavor in minutes.
Fast forward to today, and pan-fried halloumi is still one of my go-to appetizers, side dishes, or even light meals when I want something quick yet impressive. It’s the kind of recipe that feels luxurious but is laughably easy to make. Just three ingredients — and one of them is optional! Whether I’m topping it with a drizzle of honey for breakfast or pairing it with roasted vegetables for dinner, halloumi always delivers that perfect balance of crispy, salty, and creamy satisfaction.
The best part? You don’t need to be an expert cook or own any special gadgets. All you need is a sturdy nonstick pan, a few minutes of your time, and a love for good cheese. This 3-Ingredient Pan-Fried Halloumi is the kind of recipe that fits every mood and every occasion — from a quick weekday lunch to an elegant weekend snack board. Once you’ve made it, you’ll never look at cheese the same way again.
So let’s dive into this irresistibly simple yet impressive dish — the kind that makes you wonder how something so basic can taste so extraordinary.
Why You’ll Love It
-
Quick and easy – From fridge to plate in under 10 minutes. No prep, no mess.
-
Perfect texture – Crispy golden edges with a warm, chewy center.
-
High in protein – Ideal for vegetarians or anyone looking for a satisfying, low-carb option.
-
Versatile – Works as a snack, appetizer, side dish, or even a breakfast topping.
-
Crowd-pleasing flavor – Salty, savory, and slightly tangy — it pairs with almost anything.
-
Minimal ingredients – Just halloumi, olive oil, and (optionally) lemon or honey for flavor contrast.
Ingredient Notes & Details
Halloumi Cheese
The star of the show! Halloumi is a semi-hard, brined cheese that doesn’t melt when heated, making it perfect for frying or grilling. Look for authentic halloumi made from a mix of sheep’s and goat’s milk for the best flavor and texture. Cow’s milk versions tend to be softer and saltier.
Pro tip:
Before frying, pat the slices dry with a paper towel. Removing excess moisture helps achieve that beautifully crisp crust without oil splatter.
Olive Oil
A light brush of olive oil ensures even browning and prevents sticking. You don’t need much — about 1 to 2 teaspoons for a small pan. You can also use avocado oil or butter for a slightly different flavor.
Pro tip:
Avoid overheating the oil. Medium heat is ideal — too hot and the cheese may burn before it turns golden.
Optional Add-Ons
-
Fresh lemon juice – Adds a bright, citrusy finish that cuts through the richness.
-
Honey or hot honey – A drizzle over warm halloumi creates an irresistible salty-sweet balance.
-
Chili flakes, herbs, or za’atar – Sprinkle just before serving for extra depth.
Step-by-Step Instructions
Step 1: Slice the Halloumi
Start by slicing your halloumi block into ½-inch thick pieces. Thinner slices may burn too quickly or become overly tough, while thicker ones won’t crisp evenly.
Step 2: Heat the Oil
Place a nonstick or cast-iron skillet over medium heat. Add 1–2 teaspoons of olive oil and let it warm up. You’ll know it’s ready when the surface begins to shimmer — not smoke.
Step 3: Fry the Halloumi
Carefully add the halloumi slices to the pan in a single layer. You should hear an instant sizzle — that’s your sign of good heat.
Cook for 2–3 minutes on each side or until golden brown and crispy. Use tongs or a spatula to flip each piece gently; they should lift easily once they’ve formed a crust.
Pro tip:
If your pan is small, work in batches. Overcrowding the pan traps steam and prevents crisping.
Step 4: Drain and Serve
Transfer the fried halloumi to a plate lined with paper towels to absorb any excess oil. Serve immediately while warm for the best texture.
Step 5: Optional Finishes
-
Squeeze fresh lemon juice for brightness.
-
Drizzle with honey or hot honey for a gourmet touch.
-
Sprinkle fresh herbs like parsley or thyme for color and aroma.
Enjoy your 3-ingredient masterpiece straight from the pan, or use it as a base for endless serving ideas!
FAQ
1. Can I make pan-fried halloumi without oil?
Yes, you can dry-fry halloumi in a nonstick pan! The cheese will naturally release a bit of its own oils as it cooks. However, a touch of olive oil helps achieve a more even golden crust and prevents sticking.
2. How do I keep halloumi from becoming rubbery?
Overcooking is the main culprit. Fry just until each side turns golden brown — usually 2–3 minutes per side. Halloumi should be crispy outside but still soft and springy inside.
3. What should I serve with pan-fried halloumi?
It pairs beautifully with Mediterranean sides: roasted vegetables, couscous, quinoa, or Greek salad. For a brunch twist, serve it with eggs, avocado toast, or fresh fruit.
4. Can I make this in an air fryer?
Absolutely! Air fry halloumi slices at 400°F (200°C) for about 7–8 minutes, flipping halfway through. You’ll get the same crispy texture without any stovetop splatter.
5. Is halloumi keto or low-carb?
Yes! Halloumi is naturally low in carbohydrates and high in protein and fat, making it an excellent choice for keto or low-carb diets.
6. Why does my halloumi squeak when I bite it?
That signature squeak is totally normal — it’s from the high protein structure of the cheese. It’s part of what makes halloumi so unique!
Storage Tips
Pan-fried halloumi is best enjoyed fresh, but leftovers can be stored in an airtight container in the refrigerator for up to 3 days.
To reheat, simply pan-fry again for a minute or two on each side until warmed through and crisp. Avoid microwaving — it tends to make the texture rubbery.
Freezing Tip:
Raw halloumi can be frozen for up to 3 months. Slice it first, wrap tightly in plastic, and store in a freezer-safe bag. Thaw completely before frying.
Variations
Mediterranean Halloumi Bowl
Serve fried halloumi over a bed of quinoa or couscous with roasted red peppers, olives, cherry tomatoes, and a drizzle of tahini dressing.
Halloumi Breakfast Toast
Layer toasted sourdough with smashed avocado, fried halloumi, and a poached egg for a satisfying breakfast.
Sweet & Savory Halloumi Bites
Drizzle fried halloumi with hot honey, sprinkle sesame seeds, and serve as a sweet-savory appetizer.
Spicy Halloumi Skewers
Thread cubes of halloumi onto skewers with bell peppers and zucchini. Grill until golden and serve with garlic yogurt dip.
Fresh Salad Topping
Top your Greek or watermelon salad with warm halloumi slices instead of feta for a hearty twist.
- 8 oz 225 g halloumi cheese, sliced into ½-inch thick pieces
- 1 tbsp olive oil
- ½ tsp dried oregano or fresh thyme leaves
-
Prep the cheese:
-
Pat the halloumi slices dry with paper towels to remove excess moisture. This helps them brown evenly and prevents splattering.
-
Heat the pan:
-
Warm olive oil in a non-stick skillet over medium heat until shimmering.
-
Fry the halloumi:
-
Lay the slices in a single layer. Cook for 2–3 minutes per side, or until each side is golden brown and crisp around the edges.
-
Add herbs (optional):
-
Sprinkle with oregano or thyme right after flipping for a fragrant touch.
-
Serve:
-
Transfer to a plate and enjoy immediately while hot. Delicious on its own, with lemon wedges, or alongside salads and grilled vegetables.